
A reader asked me if there’s somewhere to find out what all the little symbols mean on the images you see in the Library Module’s Grid View, so I thought I’d turn it into a brief tutorial. You may have noticed there are little icons all around your image cell and thumbnail. And if you don’t see them, you’re probably wondering what I’m talking about. Just hit the J key one, two, three times and you can cycle through the three views. You can see a simple cell with no info, a compact cell with some info or an extended cell with extra information. The image below shows you the three views.

Note that the cell area is the gray part in the screenshot above. The cell contains the thumbnail and information about the thumbnail.
Here’s What All The Little Icons and Info Mean:
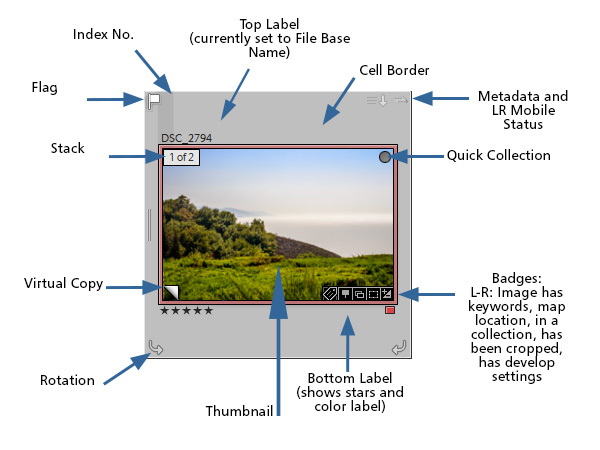
Starting at the top at twelve o’clock and going clock-wise:
Top Label – I have it set to File Base Name/Copy Name in the example above. You can change what you see here using the View Options dialog box.
Cell Border – Clicking here will select the image and deselect any previous image selected.
Metadata and Lightroom Mobile Status. You may see a warning here if there’s a metadata conflict or your image is missing. The squiggly line indicates the image is synced with Lightroom Mobile. If you have Lightroom 5 or 6 and not CC, you will not see the mobile status.
Quick Collection – Indicates this image is in a Quick Collection.
Badges – These show you more info about your image. This image has (left to right) keywords, a map location, it’s part of a collection, it has been cropped and Develop Settings have been applied to it. If you hover your mouse over one of the badges, you will see a small pop-up that tells you what it means.
Bottom Label – You can choose what you want to show here in the View Options dialog. I’m showing star ratings and color label.
Thumbnail – This is the thumbnail of the image. If you want to move or drag an image, you drag by the thumbnail, not the cell border.
Rotation – Use this to rotate your image. You will only see the icon when you hover over a thumbnail.
Virtual Copy – The turned corner indicates this another version of an image. You can apply different settings to a virtual copy without it affecting your original.
Stack – This shows the image is part of a stack and how many images are in the stack.
Flag – The flag status indicator. The white flag means it’s a “pick.” A black flag would indicate a reject. An unpicked image will have a light outline of a flag that’s visible when you hover over the thumbnail.
Customize What You See on Image Thumbnail Cells
You can choose what you see on your thumbnail cells. Go to the View Menu > View Options. In this dialog box you can specify what info you want to see displayed. Here is how I have mine set on the Compact Cell View, but you may have your own preference.

Here’s a video tutorial I created that explains in more detail about what you can choose to display in Grid View and it also covers Loupe View. As you will see, Lightroom gives you a lot of flexibility to customize what you see in Grid View.
I hope this helps you set up the Library views to best fit your needs.
What other Lightroom tutorials would you like to see? Tell me in the comments.
10 thoughts on “Lightroom Library Module: What Do All Those Icons on My Photos Mean?”
Thanks a million for this! You’ve made it very clear. If I had any sense, I’d bookmark this page!
Absolutely fantastic thankyou.
Excellent Valarie. Many thanks. I have 3 cats i work with in LR4 soon changing to LR6 I like 3 , as I think one is too big with 60000 images and growing. However, is it possible to merge the 3 cats into one and export the cat to another HDD for when I want to use it. ?? Just wondering Cheers…John.
Hi John. Yes it would be easier to have just one catalog and then use Collections to organize. But I agree that 60k is a lot of images for one catalog. You may want to consider doing a catalog(s) clean up first and remove unneeded similar images, blurry shots, etc.
The basic steps for merging your catalogs are 1. In each catalog locate and reconnect any missing photos or folders, as this will save you grief later on. If you have the same photos in more than one catalog, you’ll need to decide which settings from which catalog you want to keep, or you could have virtual copies of them made during the merge. 2. Create a new master catalog: File menu > New Catalog. Then use File menu > Import from Another Catalog to merge each catalog into your brand new master catalog. You do this for each catalog that you want to merge into the new Master.
It would be a good idea to back up before each merge just to be safe. You’ll probably need to do some final cleanup such as making decisions on virtual copies that might have been created during the merge, tidying up the Folders panel if you have photos in different places on your hard drive, and cleaning up your Collections, keywording etc.
This was very helpful. Thank you!!
You’re welcome, Kathy
I believe the 2022/23 version is different regarding the bottom left icon you call ‘Rotation.’ I believe it is now a ‘cropped’ icon and flags-up if any virtual copies have been subsequently cropped out of the original.
Great – very helpful, thanks very much.
You’re welcome, Kay. Glad it helped.