Some people love Lightroom develop presets and use them all the time while others wouldn’t even consider applying one to their image. I’m somewhere in the middle. I find they can be a huge time-saver for certain tasks, but I also found that I had ended up with dozens of presets with funky names like “Popsicle Punch” (ok I made that one up but man, there are some weird names) that I’ve never used and probably never will, cluttering up my preset panel. In this post we’ll look at ways presets can make your post processing faster and easier, and also some potential pitfalls to watch out for.
What Using Presets Can Do for You
Speed
Probably the biggest advantage is they can drastically reduce your editing time and boost your productivity. With only one click you can often transform an ordinary looking image into a great one. If you don’t like the look of one preset, click on Reset or Ctrl/Cmd + Z and you can try another one. If after applying a preset you find some settings need adjusting, you can manually tweak the sliders to get them where you want.
They’re also a great way to make short work of complex editing. Presets can get you a good part of the way and then you can finish off with the final adjustments needed that are unique to your image.
Consistency
If you have a series of images, for example landscapes, that you want processed similarly, you can apply the same preset to all the images and then make any individual adjustments necessary.
It’s Easy
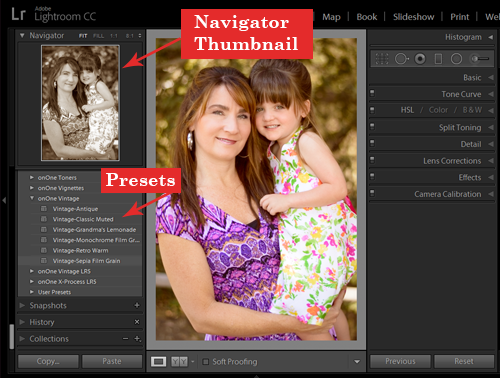
In the Develop module, open an image and hover your mouse over the various presets in the preset panel. In the Navigator thumbnail at the top you will see a preview of how that image will look with a particular preset applied. Don’t like it? Move on to another.
Another big benefit, well, this one is more of a benefit of Lightroom in general, is that all your editing is non-destructive and can be undone any time. If you apply a preset and don’t like it, you can easily undo it.
A Cheap Learning Tool
Since you can see all the settings the preset used, you can dissect what was done and learn how to create your own. Study them and unravel them and you will find yourself learning more about how Lightroom works and what you can do creatively.
Novice Lightroom users (and not-so-new users) can regard presets as a way to use another photographer’s expertise to make your photos look amazing. This is one reason why I recommend buying high quality presets rather than relying strictly on freebies, although there are some really good free ones as well. Lightroom has some basic presets bundled with the software, but they are indeed rather basic and may not be that helpful.
Gives You New Ideas
If you’re fairly new to Lightroom, using presets is a good way to get new ideas for processing your image or learning how something was done so you can learn how to do it yourself. It helps you get your image to a certain place in the editing/adjusting process and then you can make the final tweaks on your own. If you find a one you like you can even modify it and save it as a new preset.
How Do You Know What the Preset Did?
This is actually easy to figure out. Just apply a preset to an image that has no other adjustments made to it and then take a look at the sliders. Don’t forget to check the channels in the Tone Curve as well as the Split Toning panel because often you’ll find adjustments were made to these settings.
Tips for Making Your Own
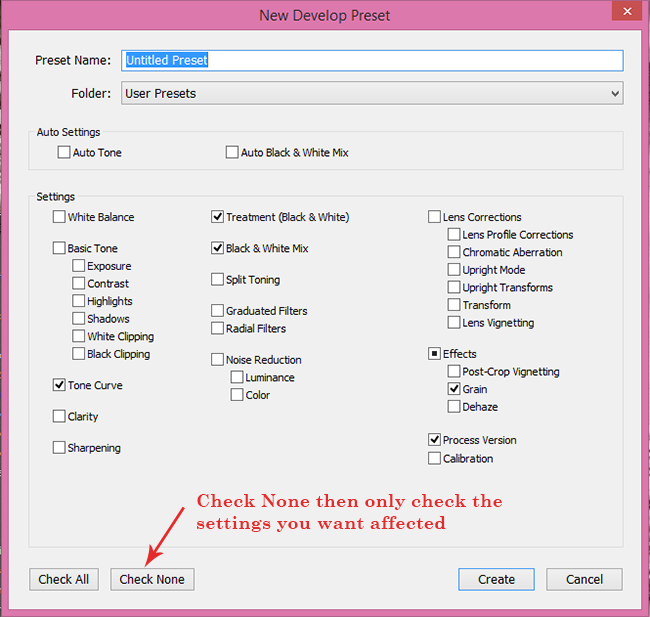
Creating your own presets is much easier than you may think. Make your adjustments on an image then hit the ‘+’ sign (Add Preset) at the top of the Presets panel. Or you can go to Develop > New Preset. Give it a name and check the settings that you want the preset to affect. I strongly recommend that you click the Uncheck All button, and then select ONLY the sliders that you want the preset to affect. Otherwise you may find the results are not what you expected or wanted.
What to Watch Out For
They’re Not Unique
Probably the biggest con is that settings are applied as a “one size fits all.” Your photo is one-of-a-kind, taken under unique circumstances and lighting and requires adjustment settings specific to that image. You may or may not be able to simply open a newly imported image in the Develop module, click one button and be done. Your photo may require additional tweaks to get it right. Plus, you want your portrait of your kids to look special, not the same as every other portrait with a matte effect added.
It’s Not Always Easy to “Fade” the Effect of a Preset
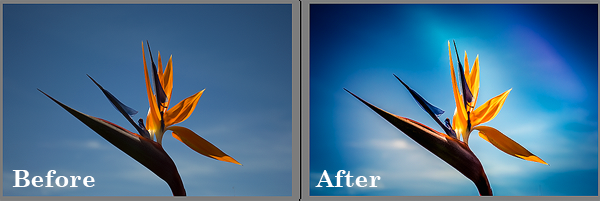
Some presets can make your images look over-processed or the effect is way too intense, like this image on the left. I have seen this with many free ones, in particular. Sometimes you can lighten or soften the effect with a few slider adjustments, but when you start having to adjust tone curves and split tone settings it may be more trouble than it’s worth. However, there are a few things you can do. In this video I demonstrate a couple of ways you can fade the effect of a preset.
Some are Poorly Made
If the preset was improperly created you could end up with problems. For example, if all of the checkbox options were selected when the preset was created they could override adjustments you already made, which means you will have to go back and redo them. This is the biggest problem with free presets from unknown sources. Well-made presets only adjust specific sliders, usually not general sliders like Exposure, for example. So if you download free presets, be careful of your source. I am not knocking all free presets; in fact I have quite a few of them myself including some nice ones from On1, among others.
If You’re Buying Presets, How Do You Know If You’re Wasting Your Money?
Ask yourself, do they offer something that I couldn’t easily create or do on my own? In other words, are they worth the money? You should only buy presets from reputable sites that will refund your money if you are unhappy with the product. Many sites will offer a selection of free presets so you can try them out before purchasing a bundle. For a lengthy list of sites offering free and paid presets, see my Lightroom resource page.
I find myself using adjustment brush presets more often than general presets that affect the whole image. For example, I have brush presets for making eyes sparkle and whitening teeth that are far better than the default ones that come with Lightroom, and I have others for adding drama to a sky or creating warm glowing lights. Brush presets let you quickly enhance your image in selected areas while avoiding a “cookie cutter” look. You can adjust the strength of any brush setting to lighten it or make it more intense just by moving the corresponding slider. Some brushes I created myself, others I got from Serge Ramelli, who offers several hundred brush presets as well as packs for landscapes, portraits, studio, fashion, lifestyle and others. For general presets I also like the 101 Lightroom Presets Pack by Cole Joseph. It’s a good value and the presets are well done. For landscapes, Trey Ratcliff’s are amazing. He offers new, very inexpensive packs every month.
Do you use presets? Do you buy them or use free ones? Tell me your experience in the comments below.