If you’re taking any travel photos of monuments or cityscapes this summer, or just enjoy taking architectural photos, chances are you’ll run into a few images that need some perspective correction, especially if you’re using a very wide angle lens or a point and shoot. I know I’ll likely run into this issue on my visit to Washington D.C. this fall, with all those amazing monuments and classic architecture. Luckily, Adobe added a new feature in the latest Creative Cloud update, Lightroom 2015.5, that will make perspective correction much easier for us: Guided Upright.
Watch my video tutorial below or continue reading.
First, the Lens Corrections Panel has been separated into two panels, Lens Corrections and a new one called Transform, which makes better sense, actually. The Lens Correction Panel just has the Remove Chromatic Aberration and Enable Profile Corrections options on the Profile Tab and on the Manual tab there are the tools to correct lens distortion, color fringing and vignetting. The Upright feature for correcting perspective has been moved to the Transform Panel. (Incidentally, this move affect all users including owners of the LR 6 boxed version, but only CC subscribers have the new Guided Upright tool.)
The New Transform Panel
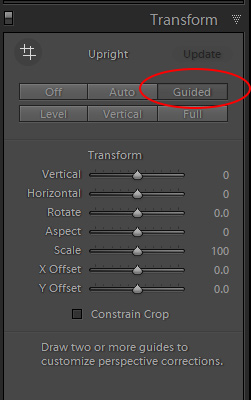 So let’s look at the new Transform Panel. You’ll see the same Upright and Manual transform sliders that used to be in the Lens Corrections Panel, plus the new Guided Upright button.
What’s the point of Guided Upright? As of Lightroom 5, there has been the Upright tool to fix perspective and straighten and level photos, and it often did a very good job with one click of the Auto button. But some photos just didn’t correct properly and there just wasn’t a good solution; it sometimes meant having to go into Photoshop. I think that Lightroom had a hard time figuring out what was supposed to be vertical or horizontal in some cases. Now, using Guided Upright, we can tell Lightroom exactly what we want to be vertical or horizontal so we can get a better correction.
Do Your Lens Corrections First
Before jumping into Transform, though, I suggest you head to the Lens Corrections panel and do your lens corrections first because Transform will take into account any profile corrections you’ve already made. If you apply your lens profile correction later, it could mess up your perspective fix. So click the boxes for Chromatic Aberration and Enable Profile Corrections before you work with Transform.
Fixing Perspective With Guided Upright
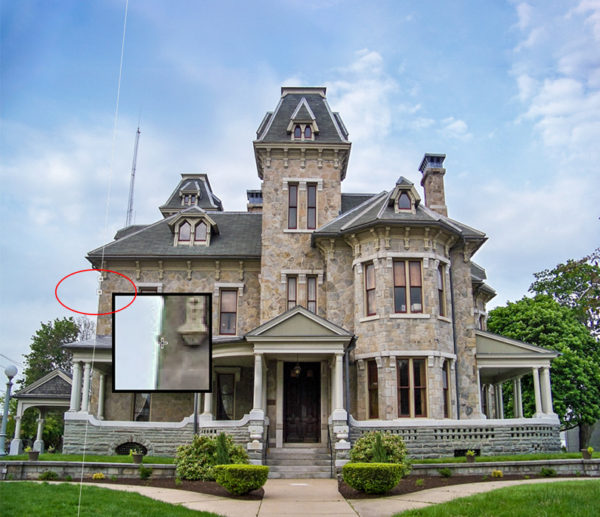
Now head back to the Transform panel. You can either click on “Guided” or click on the cross hatch tool, or if you like keyboard shortcuts, hit SHIFT + T. You want to set a minimum of two lines or up to four lines. Two vertical lines will fix vertical distortion and two horizontal lines will correct horizontal distortion.
There are little squares at either end of the line and if you hover on one, it turns into a hand. You can micro adjust your line, or to delete the entire line click on a square to make it active and then hit your delete key.
To delete all the lines – hold down Alt/Opt and Upright becomes Reset Upright; just click on it to delete everything. If you want to make changes later, go back to the Transform panel and click on the tool.
What to Do If You Get White Areas Around the Image
Chances are, once you’ve made your corrections you’ll see some white borders. Lightroom had to distort the edges of your photo in order to make the corrections.
There are several ways to deal with it. You can use the Scale slider and increase the scale or use it in combination with the X Offset and Y Offset sliders to get a better crop, or click on “Constrain Crop.” You can also crop your image using the crop tool. I sometimes find that heading straight to the Crop tool is fastest and easiest.
I hope this handy little addition to the Develop Panel helps you out. Let me know what you think in the comments, or if you have a tip for visiting D.C. let me know!